Blocking a PRS SE/CE Tremelo
Whilst I love my PRS SE Standard 24 I have never really used the trem. Maybe it’s a lack of practice but I never found the results pleasing when more than a light touch is applied. If I want a light touch then just moving the neck has been plenty. The tremelo is also a floating design, which means it is a balancing act of string tension and spring tension, if you change either the setup goes to pot. This means no 1/2 step down or drop D with out it affecting the setup.
One fix is a fixed bridge guitar, I don’t have one. The other is to block the tremelo, which literally is a block of wood that stops the bridge closing. You then use extra spring tension to hold it in. Simple and very reversible.
All of this should be the same for any SE or CE tremelo model as they all use the same import bridge, possibly an S2 but I am not 100% on that one. It will also be the same for any floating trem but the details of dimensions etc will differ.
Step 1: Measure the size of block needed
After taking off the trem cover I used some cheap digital calipers to measure the gap that needed filling. I did this with the guitar in tune with the bridge how I wanted it after blocking. I got figures of between 6.75 and 7.3mm so decided on a 7mm block.
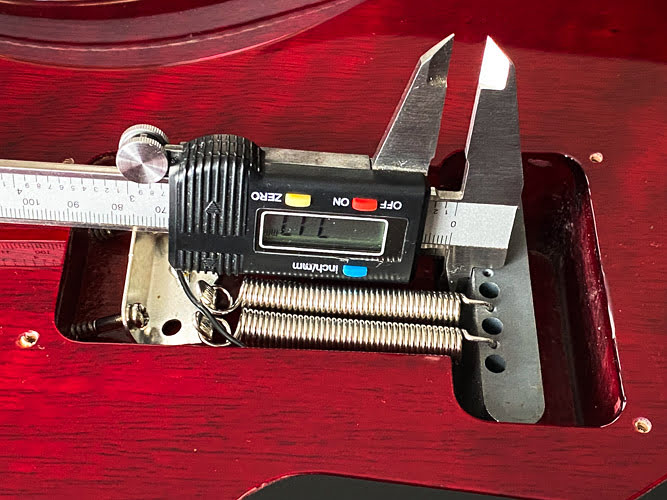
For the width I went with 50mm, the width of the strings. The hight was 20mm from the lip to the bottom of the cavity.
Step 2: Cutting the block
The block was cut from some Sepele offcuts I got on eBay cheaply several years ago. I found a strip about 7.5mm thick and cut off a piece to the size needed. Due to these being rough sawn they aren’t very even or parallel, so it took a few cuts to get a pice that was thick enough the whole width.
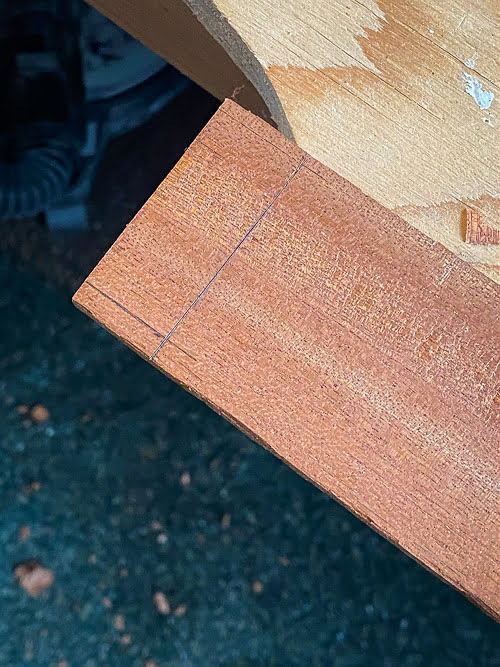
Once cut off it was sanded with some 120 to flatten it and make it parallel, the block I ended up using was 7.4mm thick at this stage.
Step 3: Test fit and refine the block thickness
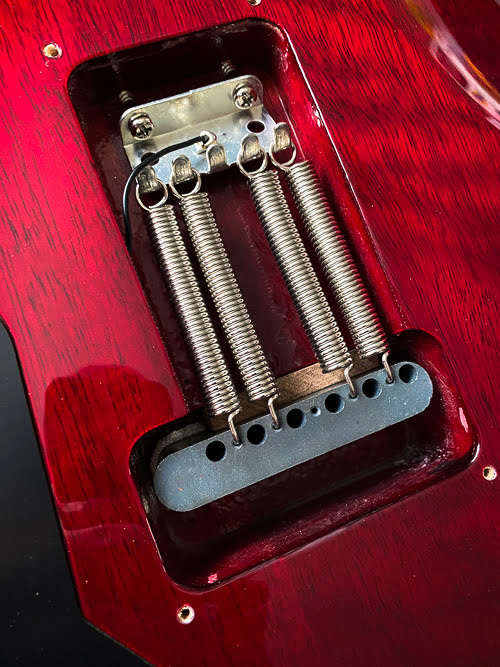
To fit the block I slackened off the strings and removed the middle 2 springs. This doesn’t need any tools just grab the spring pull to release the hook and lift it off.
Next drop the block in behind the bridge block. It should sit nicely on the wooden lip and be more or less level with the bottom of the cavity. It may help to remove one or both of the remaining springs to do this.
With the block in place add a 1/2 turn the claw springs. This will add more tension, more than the strings are applying, and so pinch the block into place. If you want to reverse the mod you’ll need to back these out to re-balance the system.
Now check the bridge is level to the body. If the back is higher than the screw side the block is too thick. If the back is lower than the screw side it’s too thin. If too thick go back to the sand paper and take off another 0.1mm, which won’t take much work at all, and retest until it’s perfect.
If it’s too thin either start again or you could glue on some sand paper which I have seen done. My first attempt was too thin, but I opted to start again.
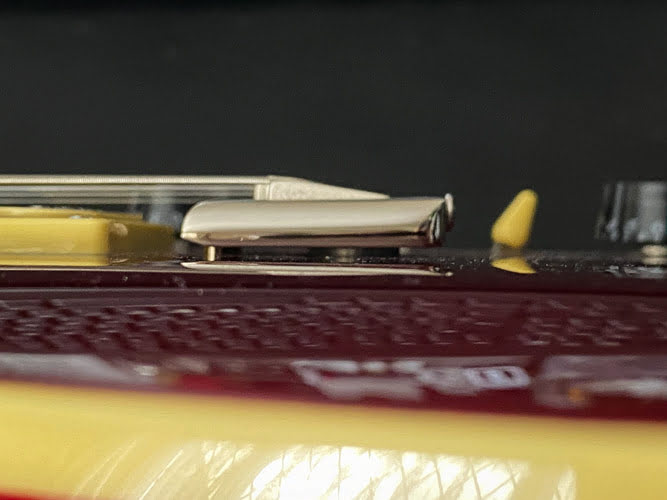
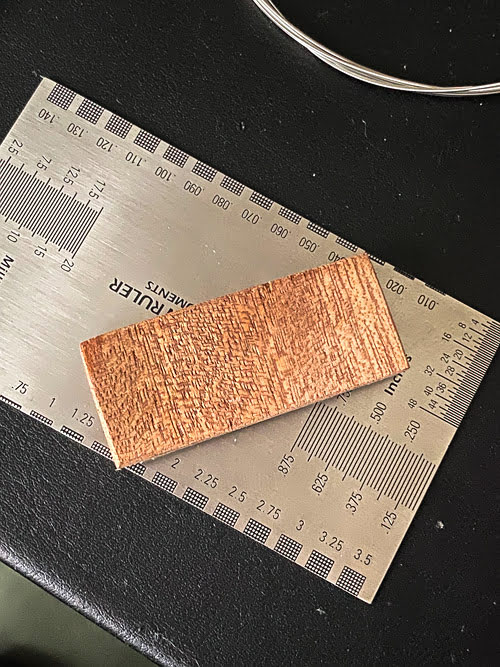
Once your bridge is nice and level take the block out again and just remove any sharp corners with some sandpaper. My final block was just over 7.1mm thick.

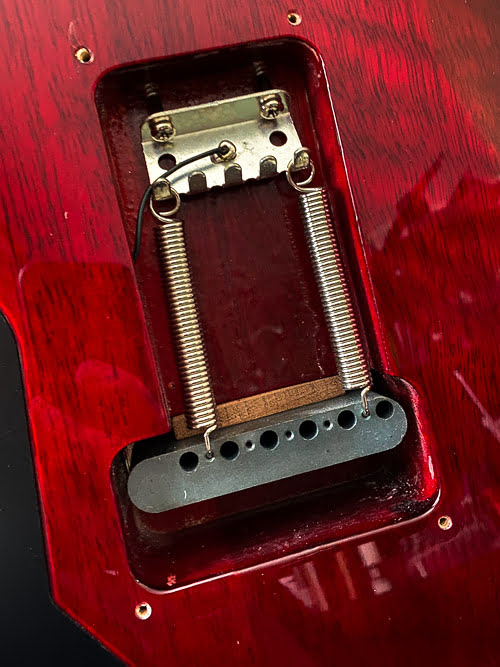
Step 4: Put it all back together
Put the block back in, add the remaining springs back, tune it and give it a go!
I found the strings felt a little more stiff, as the bridge give is gone. It sort of felt like a Fender scale tension, so a bit more but not quite as much as going up a string gauge. I also found tuning brand from slack faster as I no longer had to ballance out the spring tension just the strings which seems faster.
I also tried 1/2 step down. This took as long as a re-tune and felt great with a good action. I tried this before blocking and the bridge just bombed at the back as the tension went.
In all a pretty successful job!
Lesson note: don’t mess with the bridge screws.
Well not unless you want a lot of setup work to do.
When I put in my first block it was about 0.75mm too thin, meaning the bridge plate was too low at the back. I thought I could adjust this out using the bridge screws. Of course this is nonsense and it just lowers the plate and keeps the angle constant.
To fix this is a pain as you have 6 screws to precisely align or you will damage them, or the bridge. I backed out a couple of mine and I could see some minor damage to them already from some point in it’s life. When I got it the bridge wasn’t sat in the slots so I loosened the strings and re-seated it. So somewhere between the factory and that is probably when that happened.
After a first attempt to align it using the end screws to gauge the position and using a digital caliper I got it nicely in line but the bright was too high. My high e was already as low is it could go and so a higher bridge was no good.
I eventually found this video by the Mann[sic] who designed the bridge with PRS1. It shows how to retro fit a USA made brass version to an SE, but the setup process is the same.
This left the bridge a shade lower than it was but nice and flat, I just need to re-set my action to account for the difference.
I had strings on when I did this and I should have just taken them off. During the whole process detailed in this post I did them up and undid them several times, which in the end killed the D string which gave up right at the tuner. If I’d just taken them off it would probably have been easier and faster.
-
Mann sell full bridge kits or partial brass block, saddle and screw kits to fit SE/CE models. These look very appealing but range from $150 to $200 so are a significant cost given the price of my SE Standard. They would make far more sense on a Custom 24 or CE model. Hopefully the strings don’t stick in the blocks on them! ↩