1590BB Enclosure for Tone Geek Aqua-Puss mk1 AP2
I was lucky enough to get one of the first batch of PCBs for a Tone Geek mk1 AP2 Aqua Puss. This is a faithful replica of the infamous Way Huge Aqua Puss, the mk1 AP-2. There is an earlier AP-1 but thats true rocking horse poo. If you’re reading this you probably know what this is.
The PCB is designed to fit the Mk2 enclosure, reasonably common despite being discontinued for the mk3 “smalls”. Problem is I don’t have one, and spending ~£100 for a used one just for the enclosure seems wasteful.
Whilst working on a Klone I made a discovery, it would fit inside a 1590BB. Just.
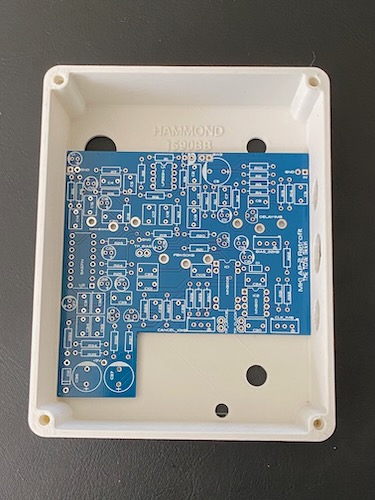
After a lot of trial and error, involving cad models, 3D printed tests and 1 wrong metal enclosure I got it to fit. Just.
Whilst it can fit it needs to be built to do so.
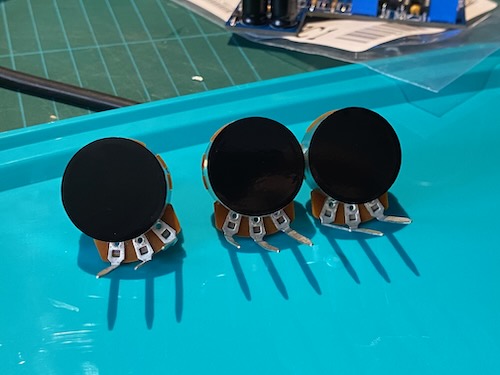
Do not use the PCB insulator boards, they add height you don’t have. Instead use some tape or vinyl to insulate the back of the pots. I used vinyl cut on a plotter but it’s not hard to hand cut. Mount the pots as close to the PCB as you can. I spaced them with a business card to stop them pushing directly on any pads and cutting the vinyl.
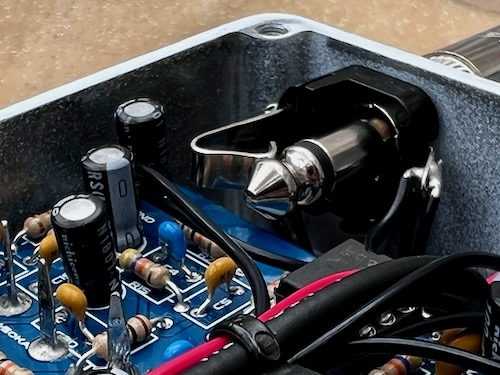
Make sure the big electro caps are firmly seated as these are the high points and there’s not much clearance.
You will also need to use Lumburg KLBM 3 Mono jacks. I find these to be the most compact available and are what are used in my build. Availability has been spotty over the last year or so but they can still be found. RS do a very similar jack but the quality isn’t as good.
With it all assembled you have about 1.5mm clearance between the PCB and the arm on the jack socket. The jack it’s self has about 1.5-2mm clearance.
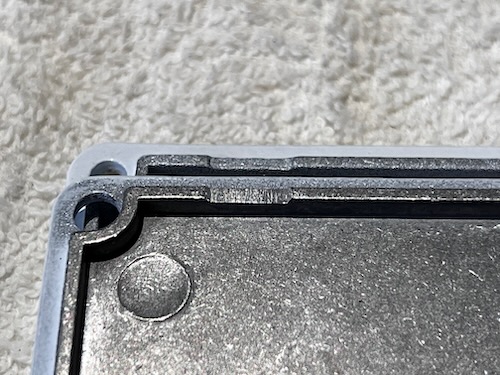
On my most recent build I discovered a small change had been made to the Tayda enclosure lids. The older one had 2 small notches in the lid around 0.6mm deep. These gave the perfect amount of clearance when doing the final tests for a 2nd attempt. It’s possible to address this with a small file to manually add the notch back in. Being so small and shallow this doesn’t take long. The Tayda drill project has since been adjusted by 0.5mm which should be enough to resolve this with out going too far and hitting the PCB.
If you’d like one for your build, you can order it from Tayda ready to use.

The knobs used are generic “klon style” black knobs for the main 2, with a Davies Moulding 1400 in the middle. This is a better match to the bigger knobs than the generic options. The Davies Moulding 1470AQ for the main knobs, and 1400 are available from Mouser when in stock.
Order your own enclosure
You use this at your own risk. Whilst I have ordered and used one with the below specifications I cannot guarantee it fits your build. There was a minor tweak added after my most recent build to address the jack clearance issue detailed above. This has not been tested but should fit.
The enclosures are supplied by Tayda, an electronics parts supplier based in Thailand. Ordering them is a multi-step process but not too complicated.
You will need to pick a 1590BB of your choice, I went with the gloss white but matt white might work well too. You will also need to purchase the custom drilling, and if you want the design printed you need UV Printing, and gloss varnish. You need to order all 4 items: enclosure, drilling, UV printing and gloss varnish for this to work.
Once you have paid for your order of enclosure, drilling, UV and gloss you have to wait 15 minutes. In this time go to the drill layout link below and save it to your account. You also need to create a new UV template, with the below settings, upload the PDF linked below and save this as well.

After 15 minutes you will be able to create a drill job in the Tayda toolbox. Pick the drill layout and UV layout created above and submit it.
In a week or so a nice new enclosure will arrive at your door.
Files
The drill layout is available here: drill layout
The PDF required for UV printing is here: uv layout (includes black design, and optional gloss layers)
Like what you read?
This post is provided free of charge. However if you wish to support the work it took to make you can choose to donate via paypal.
Please don't feel obliged and the initial value is only a suggested one, feel free to reduce or increase it as you wish.